The hatch is the largest moving part on the trailer and proper fit-up seem to be the hardest part for most builders, from what I have read. Cuts need to be precise, need to account for hinge and seal thickness, trim pieces, latching mechanisms, lighting, bracing, hatch supports, etc. the list goes on.
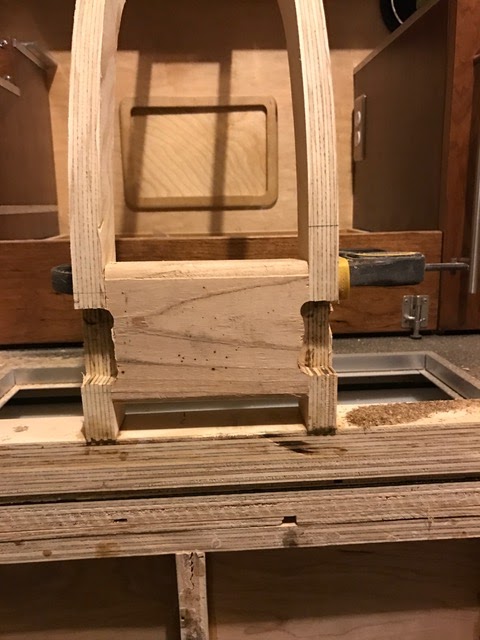
I finally cleared off the work bench to make room for the galley hatch assembly. I screwed down some 2x4's to assure the hatch frame was going to be square to the world during gluing and screwing. I first assembled the top and bottom beams to the side ribs in the jig and let it dry. I measured from side to side and diagonally several times before final clamping to assure the frame was square.
 |
| Work Bench Cleared and Jig Screwed Down |
 |
| Added Support to Brace Curved End of Hatch |
 |
| Another View of Curve Support |
 |
| 2x4 and Spreader Clamp to Assure Outside Ribs are Tight to Jig |
 |
| Bar Clamp for Bottom Frame Rail |
So once this frame dried, I wanted to make sure everything was lining up with the sidewalls, top and bottom correctly. I only cut 2 of the hatch ribs to length for this initial frame in case I got something wrong, then I wouldn't have to re-cut all the ribs over again. To assure proper fit-up, I made two small mockups of the seal and aluminum trim that will ultimately be installed on the hatch and galley counter top. I used these mockups to prop the hatch to the correct elevation against the counter top.
 |
| Seal and Hatch Gap at Counter Top |
 |
| Seal and Aluminum Edge Molding Mockup |
 |
| 1/4 inch Gap at Sidewall of Galley and Hatch Frame - Driver Side |
 |
| Overall View of Galley Hatch Frame |
 |
| 1/4 Inch Gap at Hinge Location for Hurricane Hinge |
I next needed to locate the hatch lock handle on the hatch frame, which the handle is not centered on the assembly as seen below. Hatch ribs need to be located to support the lock assembly.
 |
| Hatch Lock Assembly |
 |
| Rib Location for Hatch Lock |
 |
| Center Ribs Installed for Hatch Latch Assembly |
I needed to recess the lock assembly, so I clamped a block between the two ribs so I could run the router level thru the rib.
 |
| Routing for Lock Assembly Recess |
 |
| Routing for Lock Assembly Recess View 2 |
 |
| Recess Complete with Block Removed |
 |
| Recess too Deep, Bad Measure, Will Fix Later |
 |
| Hatch Lock Assembly with Connecting Rods |
 |
| Aligning the Latch Rods thru Ribs |
 |
| Mockup and Test of Latch Rods thru Ribs |
I must have accidentally deleted some of the photos of the hatch assembly progression, so the photos below are of the completed hatch framing. As you can see in the picture above, I doubled up the ribs in the area of the hatch lock assembly so I could screw the face plate into the ribs. This also provides some additional strength for the ribs that had the recess cut out for the latch assembly and holes needed for the latch rods.
I spoke with Frank Bear over at Vintage Technologies in Michigan where I bought all my doors, windows, latch assembly, and some trim pieces thru the internet. He told me the ribs for the hatch should be at least 2-1/4 inch deep to keep the plywood ribs from springing out due to the residual stress that the plywood skin maintains after gluing. I did notice in one of the photos I modeled my trailer after after that the ribs were deeper in the curved section of the hatch, but didn't think much of it.
I had no room to spare with my cabinets completed and only 1/2 inch space to spare between the inside of the hatch and my pullout stove drawer to build deeper ribs, so I decided to have some reinforcements fabricated to help with the potential issue. I gave the fabricator one of the hatch ribs and had him cut stiffeners out of 1/8 inch thick aluminum, 1/16 inch narrower than my ribs, so I could mount one brace to each of the ribs and still glue the skin to rib interior and exterior faces. I only made the braces long enough to cover the curve and a few inches into the tangent. I attached the stiffer with epoxy cement and screwed the brace into the rib. The braces only added about 1-1/2 lbs to the overall hatch weight and the stiffeners cost me $75 complete.
 |
| Oregon Trailer Hatch - Deepened Rib Section in Curve |
 |
| Hatch Braces Installed - Passenger Side |
 |
| Hatch Braces Installed - Driver Side |
 |
| End View of Stiffener |
 |
| Hatch Framing and Bracing Complete |
The bracing in the lower portion of the hatch was initially going part way across for mounting the LED lights, but I decided to go full width, which significantly helped stiffen the hatch laterally. I used epoxy cement (Gorilla Glue) to attach the wood bracing to the aluminum.
 |
| Hatch LED Light Mounting Location in Curve |
 |
| Driver Side Taillight Mount |
 |
| Passenger Side Taillight Mount |
 |
| Taillight Assembly |
I also added 3 more ribs to the front of the trailer, each side of the battery box frame, to have a solid surface to mount the side trim interface between the trailer and the battery box.
As you can see I have been insulating the trailer in my spare time between parts being glued together. which means the exterior skin for the roof is going on soon. This is where you need to really think through all the anchor points for all things attached to the trailer. I'm not mounting anything to just 1/8 inch plywood and 0.040 aluminum skin.
 |
| Added Ribs for Trim Mount between Trailer and Battery Box |
I soaked the battery box lid exterior skin for 3 days in saturated towels to get it to soften up for the install. I kept the clamps on for another 3 days to let the wood completely dry out to assure the glue would hold before unclamping.
 |
| Battery Box Lid - Exterior Skin Install (Profile View) |
 |
| Battery Box Exterior Skin (Top View) |
The battery box lid has a 1 ft. radius curve mounted onto 1-1/2 inch deep plywood ribs without any aluminum bracing like the galley hatch. I did notice a little outward spring of the ribs, but not noticeable enough to effect the appearance or seal of the lid to the battery box. Maybe 1/8 inch total. I will see how it holds up over time, the creep may continue!


No comments:
Post a Comment