I got a lot completed this week as I am taking Fridays off over the next month to burn up vacation, (use it or loose it policy). I did some router work on the side panels in the evenings in preparation to install the ceiling on the camper and I decided to get the fenders installed before I erect the side walls. The fenders are fixed (welded to the frame) and the side panels are too close to the fenders that I was afraid I would burn the side wall panels. I know it will be a pain to work around the fenders but once the sidewalls are up, most of the work will be on the interior except for the exterior skin.
I explained the problem with jigsaw cutting last week and I need to take care of making both panels square to each other. I laid the interior faces together, aligned and clamped the panels together and got the belt sander out.
It doesn't look like much to sand but when you have to go around the entire perimeter, making sure you are at 90 degrees to the face, it takes some time. A new 80 grit belt helps cut the time down.
The end product, flush both sides.....the sides are square, just the photo is crooked!
Since I had to purchase a full can of resin to fix the router bit slip I had last week, I decided to coat the bottom of the plywood that will be sitting against the frame with some of the leftover resin to protect the wood from rot. I cut an inch off of a Chip Brush so I could push the resin up into the end fibers of the plywood.
 |
| Chip Brush and Resin |
 |
| Bottom Edge of Plywood Coated |
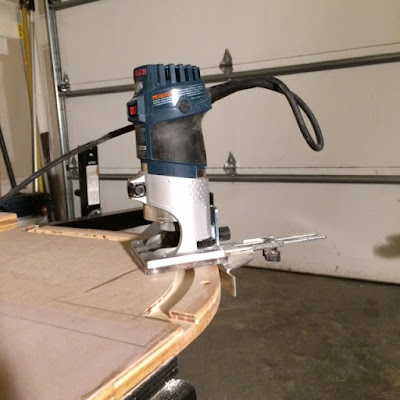
I purchased a palm router to do the recess for the roof and all areas that will receive spars to support the roof, front and rear panels. The palm router provides more control for these critical cuts which will be the interface of 1/8 inch plywood ceiling panel and the sidewalls. Total route-out from the exterior edge to the interior is 1-5/8" (1.5" for spars and 1/8" for the plywood ceiling panel. I routed the mortise 1/4 inch deep. The router also came with a fence that I needed to guide the router head against the outside edge.
 |
| Routed interior cut first, 1-5/8" in from edge and ate away the remaining material after |
 |
| Finished curved section |
Remember the panel I installed in the galley area to cover the splice, you should probably leave it off until all the routing is done. The 3/4 inch panel interfered with the the router for the roof spar recess in 2 areas. Not a big deal, just need to bring out the chisels for these 2 small areas.
 |
| Galley panel installed before routing the recess |
 |
| Router base came in conflict with raised panel |
 |
| Same on the other end |
 |
| Completed passenger side panel |
Once the panels were finished, I got after installing the fenders. I fabricated the supports from 1x2 rectangular tubing, 11 gauge. I used 11 gauge plate steel to cover the fenders and step on the back and I made the frame for the fenders from 3/4 x 3/4 x 1/8 angle. Now I know why fenders cost so damn much; they are a pain in the ass to make, or at least how I am making them.
 |
| 1x2 tube support brackets welded to frame |
 |
| Back step / platform on rear (tack welded in place) |
 |
| Full length weld to hold plate to supports |
 |
| Edge weld ground, rounded to approx. 1/8 Rad. and sanded. |
To make sure I had no conflicts with tire rub in the fenders, I superimposed the suspension and tire in its fully compressed travel position (Purple Outline). Suspension has 3-3/16 inch travel.

 |
| Fabrication Jig for Welding Fender Frames |
 |
| Frame Positioned Over Tire to Check Fit |
 |
| Frame Positioned Over Tire to Check Fit (View 2) |
The beauty of fabricating your own fenders is you get to have them exactly the way you want. I have always liked a little tire projecting out past the fender to give a rugged custom tire / wheel look, but not too much tire past the outside edge.
 |
| outside fender frame relation to tire. |
Once everything checked out, I welded up the remaining 3 frames and attached them to the support arms.
 |
| Scored Sheet |
I purchased 2 miss-cut sheets of 11 gauge steel sheets for $0.40 per pound or $20 for both plates 26" wide x 42" long plates. I cut the pieces with my disc grinder and a metal cutoff blade. Surprisingly easy to make very accurate cuts freehand. Just lightly score the metal with the blade and make several passes to complete the cut.
 |
| 1/8 Inch Setback |
I cut the steel sheet pieces 1/4 inch short of the overall width needed to cover the fender angle frame so I would have sufficient room to weld the plate to the frame and round the outside edges to an approximate 1/8 inch radius like I did on the fender step .
 |
| Positioned Top Panel |
I positioned the cut sheet onto the frame and tack welded in place.
 |
| Fenders Taking Shape |
All the cut sheets are tack welded in place and ready for final welding. Calling it a day!
I don't know if you will see much progress over the next week with Thanksgiving holiday and the fact that I have over 35 LF of weld to lay down to cover the perimeters of the fender, along with grinding, cleaning, sanding the edges, etc.


No comments:
Post a Comment