I have been out of the country on a family vacation for the last two weeks and it was nice to take a break from the build for a while. I was glad to see that all the things I order for the trailer before Christmas, that did not arrive before we departed, were all sitting on the front porch when we returned.
I put my energy into the back galley area this week, thinking through the plumbing layout, potable water tank positioning, access to all the components for potential future repair and thinking through the electrical layout in more detail.
The only reason I purchased a 22 gallon tank is because it was the only thing above a 5 gallon tank that had dimensions that would fit in my galley back compartment.
I had to build up the floor to try and keep the bearing and weight of the tank off the ribs in the back curved portion. I screwed 2 x 4's and plywood down onto the 9 inch ledge remaining on the trailer frame and deck. The rest of the platform extending into the curved section is cantilevered over the curve to avoid loading the ribs and 1/8" plywood cover with load from the tank.
 |
| 2x4's are below the plywood cantilevered into the curve. |
 |
| A Second Layer of Plywood Cantilevered to Hold the Tank Containment Angles |
 |
| Positioning the Strap D-rings to Hold Down Tank and Pump Placement |
The space I provided for the tank is so tight that I didn't have room to frame in tank bracing with 2x4's so I resorted to angle iron to hold the base of the tank from sliding around and Tie -down Straps to lock the tank into the angles. To keep the screws from wearing into the tank from the angles, I recessed the screw heads so the plastic tank is bearing on the angle iron.
 |
| Drilled angles to retain the long sides of the tank |
 |
| Countersunk Holes for Screw Heads |
 |
| Dry Fit-up of tank, hold-downs and pump. |
I decided to paint the interior of the tank compartment and front storage compartment white because I will not be putting lights in these areas hoping visibility will be better. Also, I wanted to paint the angle iron to keep it from rusting and paint on the plywood to provide some protection in case the tank leaks.
I had to offset the tank to the drivers side of the compartment to accommodate the galley sinks depth which is positioned on the passengers side. I only have approximately 2 inches of clearance from the bottom of the galley counter top to the top of the fresh water tank.
 |
| Painted Tank Compartment and Angle Iron Keepers |
 |
| Painted Front Storage Compartment and Urethaned Access Hatch |
 |
| Front Radius Panel Painted and Urethaned |
I anchored down the tank with the hold-down strap sand didn't like how the S-hooks were resting against the tank, (twist in the strap and hook rubbing against the tank), so I decided to cut off the hook and run the D-ring through the strap loops.
 |
| Strap-down of the tank |
 |
| Cut-out of S-hooks and Installed D-rings |
 |
| Tank Secured with Straps and Angles |
After I installed the laminate on the galley counter, I used an edge trimmer to cut the laminate to the edge of the counter. The counter top fits into routed grooves in the trailer side walls so the added thickness of the laminate doesn't fit into the slot. I routed the laminate off the surface to allow the counter to slide into the groove.
 |
| First Pass routing off Laminate |
 |
| Routed just deep enough to remove laminate |
 |
| Counter top Fit-up View 1 |
 |
| Counter top Fit-up View 2 |
The counter top was just a dry fit-up to make sure things were fitting-up OK and to assure I had no conflicts with the sink and tank locations. I removed the counter top and proceeded to plumb-in the majority of the piping. I am waiting on a replacement part that was broken on the pump when I received it, a Deck Wash connection fitting and the cold water faucet so I can finalize the piping and permanently install the counter top.
 |
| Plumbing 80% Complete - View 1 |
 |
| Plumbing - View 2 |
 |
| Tank Filler and Tank Vent on Passenger Side |
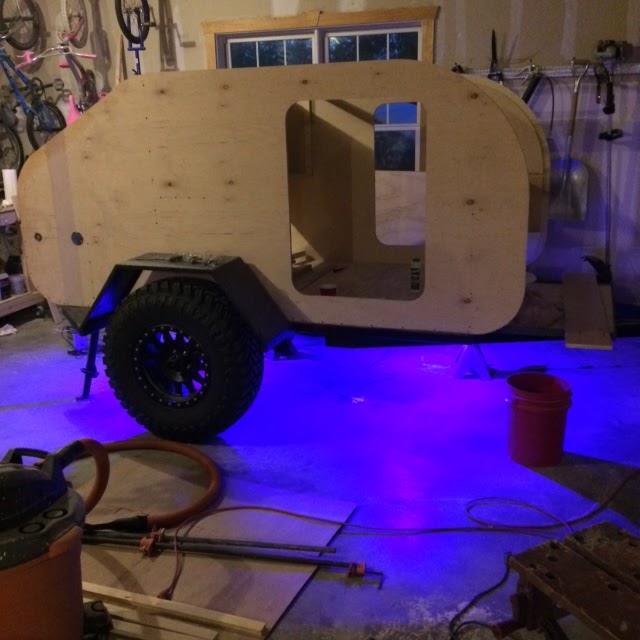
One of the packages sitting on the front stoop when we got home from vacation was a ground effects lighting system I ordered. They are call Rock Lights used on Jeeps and other 4x4 trucks. It comes with 4 aluminum housed waterproof RGB, LED light fixtures and a controller unit. Just download their App and you have a Bluetooth remote control to do what you want.
 |
| Blue |
 |
| Red |
 |
| Green |
 |
| Purple |
A little early in the build to be screwing with this kind of stuff but I had to check it out. The thing only cost $56 delivered; and for the money it looks pretty cool. You can adjust to any color you want, including white, synchronize to music, strobe and is dimmable.


No comments:
Post a Comment