I have been very uncertain about bending the trim around the tighter radius I designed into my trailer. The ones I have been modeling mine around have trim around what I would consider a tight radius, but the gentleman I spoke with at Vintage Technologies said he has only bent the edge trim around a 24 inch radius for his builds. I checked around some local places to see if they would roll bend the edge trim and no one was really very helpful, so I gave it a go on my own.
I first started out making a template out of some scrap plywood that was left over from building the main box. I took a cutoff of from the two sheets of plywood I glued together for the galley area and cut a 9 inch radius to mimic the curves at the bottom front and rear of the trailer. Knowing my curves were 90 degrees, I marked out the start and stop point and began to screw the molding to the template. Slowly moving around the curve, I was surprised how easily the trim conformed to the curve with out buckling. There were a couple little offsets, but nothing that couldn't get hammered back into place.
 |
| Form used from Scrap Plywood |
 |
| Edge Molding Formed to 90 Degrees Around 9 Inch Radii |
 |
| Verify the Length of Trim Remains Straight (8 ft Piece of Edge Trim) |
 |
| View From Other Side |
 |
| A Slight Deflection of the Edge Mid-bend |
 |
| Trimming off End to 90 Degrees |
 |
| Use Template Line to Assure Straight Cut |
 |
| Finished Cut where Trim Meets the Frame |
 |
| Fits the Curve Nicely |
 |
| No Form Needed in 24 Inch Radius at Top of Trailer |
 |
| Slowly Form Molding Around Curve and Install Screws Progressively |
 |
| Front View of Edge Trim |
This is as far as I need to take the edge trim for now until I get the aluminum skin on the front and top of the trailer. I just needed to know I could form this without having someone specially bend the pieces. This test piece will be removed and set aside so I can install the front and top aluminum skin.
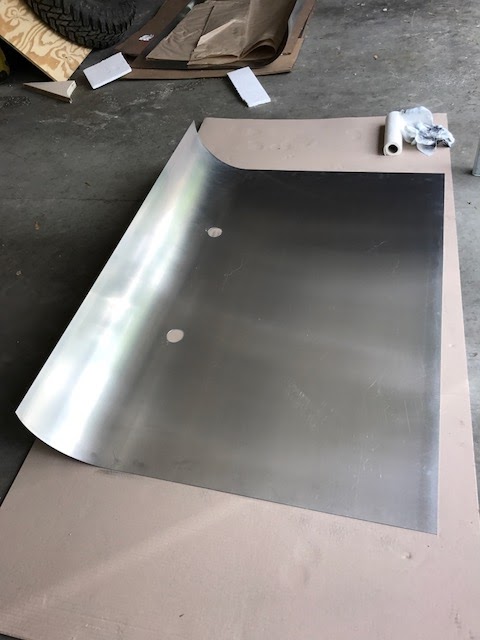
To avoid waste when skinning the trailer front and top, I order two more 4 ft x 10 ft sheets of 0.040 aluminum and had them sheered into 4 ft x 5 ft lengths to cover the 5 ft width of the trailer. I will overlap and rivet the seams as I go. I tried to pre-form the curve in the aluminum sheet by using a 12 inch diameter plastic pipe for the tight curves at the bottom front and rear to no avail. There is no way one can hand form a curve to start at the very leading edge by hand on a 5 ft wide sheet of aluminum. You might be able to do it with a lighter gauge sheet but the 0.040 is not that easy to form by hand. I took 2 of the 4 x 5 sheets to a fabrication shop that did roll bending of metal sheet and had it pre-formed. I should have ordered the protective plastic on the aluminum, as the rollers do a number on the finish. So much for minimizing scratches!
 |
| 2 Sheets Pre-Rolled with 9 Inch Radii |
 |
| Front Piece with Holes Cut Out for Electrical to Battery Box |
I was able to cut the holes with a core hole bit meant for wood. I used a piece of plywood to backup the aluminum for drilling and the wood bit did just fine making it's way through the aluminum.
 |
| Another View of Front Sheet Prepped for Front |
I did a test fitting of the front piece and the radius seemed a little tight and stood off the body by 1/2 inch. I placed the thick edge of a shim between the frame and the sheet for initial installation so I have approximately 1/4 inch gap between the frame and aluminum sheet. This gave me a little space for the sheet to move when rolling out the aluminum with the adhesive on it.
 |
| Shim Spacer to Offset the Aluminum Sheet - Passenger Side |
 |
| Shim Spacer to Offset the Aluminum Sheet - Driver Side |
 |
| Aluminum Sheet Installed |
 |
| Aluminum Sheet Installed Front View |
 |
| Aluminum Sheet Installed Side View |
 |
| Another Side View |
Up near the top where the star gazer window is, the aluminum sheet still wanted to pull away in the 24" radius area from the adhesive somewhat. I routed some of the aluminum out at the window opening so I could get some clamp in to hold the sheet down while the the adhesive dried. I also placed a couple screws in at the edge of the sheet where the overlap will occur to keep the sheet in place.
On to the back side sheet below the galley. I trimmed approximately 18 inches off the length off the 4 ft sheet to make it easier to handle. Again, I use a 80 grit sand paper to scuff up the surface to receive the adhesive and wiped the surface down with mineral spirits.
 |
| Sanded Interior Surface of Aluminum Sheet |
 |
| Back Area Prepped |
 |
| Adhesive Applied to Wood Skin |
 |
| Adhesive Applied to Aluminum |
 |
| Aluminum Sheet Installed |
 |
| Aluminum Sheet Installed - View 2 |
 |
| Tail Lights Installed but not Wired |
This is not a real important component of the build, but I needed an antenna for the stereo. I just don't like drilling holes through the finished side of the trailer box. I picked this location because the antenna mount needed to be adjacent to the stereo compartment inside the galley to kept the wires from being exposed.
 |
| Antenna Wiring through Sidewall |
 |
| Another View |
I also received the propane tank mount this week. Cheapest I could find was $106. It is a very sturdy assembly but still overpriced. The 10 pound propane tank cost $50 and by the time I put fuel in it and get a hose with a regulator, I will have $200 hanging off the outside of the trailer. At least it comes with a latch you can lock!
 |
| Propane Tank Mounted |
 |
| Propane Tank and Antenna Mounted |
I purchased a 48" long hurricane hinge for the battery box lid which I cut down to 42" to cover the width of the lid. I mounted the lid to see how things were fitting up and it appears to be generally a good fit. The curved lid has a slight bow in it which made it a little difficult to slide the hinge into the slot, but the lid and hinge functions properly.
 |
| Battery Box Lid Installed |
 |
| Trim Strip Installed Over Screws |
 |
| Gap at Edge for Seal |
Now that this test fit-up is done for the battery box, I will remove the lid, install the aluminum skin, trim out the edges and install the seal. I will complete this after I finish the top of the trailer which will have enough aluminum cutoffs that I will use to cover the lid and front of the box.


No comments:
Post a Comment