I finally got around to ordering the cooler for the galley area. I dimensioned the space around a Coleman Steel Belted cooler which cost approximately $130. I found a similar one for approximately half the price on Amazon and it fit perfectly.
 |
| Cooler in Galley Area Drawer |
 |
| Cooler Drawer Extended |
 |
| Cabinet Clearance Passenger Side |
 |
| Cooler Cabinet Clearance Driver Side |
 |
| Overall View |
I needed to make the receiver tongue for the trailer; I originally was going to get a multi-directional receiver hitch but but I didn't want to spend $250 for it at this time, so I moved forward with the $30 option of purchasing 28 inch long 2" x 2" x 1/4" thick square tubing and a 2" ball coupler. This will work just fine for most uses until we really want to do some serious off-roading; I can just purchase or make that attachment later. I made my coupler tongue just long enough to so if I ever get into a jack-knife situation or tight turning condition, the bumper of the car will hit the tongue in lieu of the battery box.
 |
| Multi-directional Off Road Coupler +/- $250 |
 |
| 28 Inch Long Square Tubing with Holes Drilled |
 |
| Tongue Coupler Fit-up |
 |
| Tongue Coupler Fit-up - View 2 |
 |
| 2 Inch Ball Coupler Attached |
I will disassemble the coupler, paint the tongue black, get some chains installed and this part is complete.
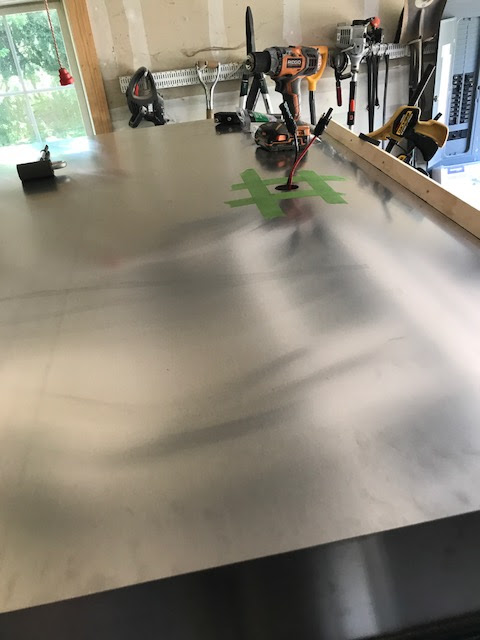
I need a relatively accurate cutout for the solar cable entrance through the aluminum sheet, so to get an accurate dimension I string lined across the front sheet to get the offset distance from the front sheet to the cable entrance. I also need to take out some of the aluminum at the star gazer opening so I can clamp the aluminum sheet through the curve.
 |
| String Line to Measure Cutouts for Next Aluminum Sheet |
 |
| Measuring for Solar Panel Electrical Connection |
 |
| Taped off Area for Cutouts |
I want the top center sheet above to overlap the front and back sheet to address the natural flow of water off the roof, so I trimmed the back sheet to length and installed it before the top center sheet.
 |
| Trimming Top Back Sheet to Length with Router |
 |
| Top Back Sheet Installed |
The back top sheet ends just before the vent opening so the riveted seam will not conflict with the vent lip, and I should get a good seal.
 |
| Back Top Sheet Ends Just Before Vent |
 |
| Preparing for the Last Top Sheet |
 |
| Top Sheet Installed and Solar Panel Leads Run Through |
I knew that cutting the top sheets to a 5 ft width would present it's problems for alignment, but I couldn't get aluminum sheets longer than 10 ft (cut in half) nor did I want to waste 3 ft off the edges by using a 4 x 8 ft sheet of aluminum. I will thoroughly caulk under the edge trim, and the edge trim will fully cover the offset.
 |
| Slight Drift of Top Sheet (Drivers Side) |
 |
| Drift of Top Sheet (Passenger Side). Will Trim with Router. |
 |
| Trim will more than cover the offset |
 |
| Solar Panel Cables Through Roof |
 |
| Caulking under Panel Joints Before Riveting |
 |
| Added Caulk to Each Rivet Hole before Riveting |
 |
| Excess Caulk Protruding from Seam |
 |
| Joint Rolled after Caulking |
 |
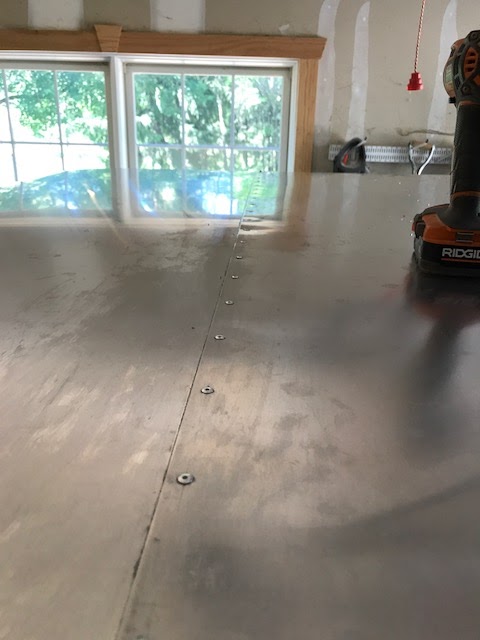
| Rivet Layout - 3 Inches On Center |
 |
| 1/8 Inch Rivets being Installed |
Once I complete installing all the rivets, I will caulk the heads so moisture cannot penetrate through the shaft area of the rivet.
 |
| Roof Rivets Complete |
 |
| Another View of Roof Rivets |
The sheet layout landed a seam at the star gazer window location. Although there will be a ridge at the interface of the window and the aluminum, I figure the window can hold the aluminum in place verses having a full width seam somewhere else on the trailer. I will just need to assure I have sufficient caulking around the window frame.
Since the seam landed in the 2 ft radius curve, the sheet didn't want to lay flat, so I clamped and held the seam in place while I riveted the area in the curve.
 |
| Seam Bowing Up in the 2 ft Radius Area |
 |
| Front Edge Seam by Star Gazer Window |
 |
| Rivet Layout at Star Gazer Window |
 |
| Avoid Rivets under Trim |
I trimmed out the excess aluminum at the vent area and the solar panel cable entrance to finish the installs on the roof. I used a butyl rubber sealant around the perimeter where the screws will be placed and this butyl will seal up around the screws.
 |
| Butyl Sealant at Roof Vent |
 |
| Another View |
 |
| Install Complete |
 |
| Vent Trim Ring Installed |
Interior on the trailer is complete with the exception of installing shelves in the sleeping quarters cabinets, installing 1 trim piece and the TV; time to get the trim on and complete the galley hatch and battery box.


No comments:
Post a Comment