The last item to complete this project for use is installing the skin on the galley hatch, installing the seals, caulking some small areas to make the trailer water tight and wiring up the trailer lights; oh... and cleaning up the mess I have made over the last 8 months.
I decided to install the galley hatch aluminum off of my pickup truck tale gate and the Black & Decker Workmate bench because the curve in the hatch makes it more difficult to work on and clamp when sitting on the garage floor. My Workmate is over 20 years old but was an indispensable tool during the build. Get one if you don't already have one!!!
The process is basically the same as all previous installations using the Formica 145 neoprene adhesive and carefully laying out the aluminum sheet. I had my son Garrett and a couple of his friends give me a hand aligning the aluminum sheet. I started and the bottom of the hatch, aligning then clamping the sheet on the leading edge. Using the laminate roller, I worked my way through the curve letting the weight of the aluminum sheet help to follow the curve contour and working the roller up to the top. I used spars and straps to hold the aluminum down through the curve while the glue cured along with clamping the edges as often as I could.
 |
| Overall View of Final Clamping |
 |
| View of Leading Edge - Workmate Helping to Clamp Edge! |
I left the top and sides of the aluminum run long to trim off later in case the alignment was a little off. I had to rout out some of the aluminum at the top to get the straps to hookup to the hatch frame. I did temporarily screw in a 3/4 x 3/4 inch angle along the top of the hatch so the hooks had something to hang onto.
 |
| Straps to Hold Down Spars in the Curve |
 |
| Clamping of the Edges and Aluminum Overrun on Edges |
 |
| Another Angle of Edge Clamping |
I stripped the clamps after about 4 hours, once the glue was no longer tacky at the edges. I masked off the areas that were going to get trimmed and followed the same process for trimming the curved edges as I did with the battery compartment lid; used a spare rib as the guide for the flush cut router bit.
 |
| Aluminum Skin Post Clamping |
You are probably wondering why I have a cutout where the hatch latch mechanism is? I could never really figure out why the latch handle (not shown) has 2 screws that land directly on the latch mechanism plate, with no screw holes for the handle to attach too. I will need to make a raised cover plate to cover the mechanism which I plan to make from the leftover HDPE sheet I made the roof rack shims from. I need to play around with design I will like, but in the mean time, I will most likely cut a rectangle or oval cover plate to keep things moving.
 |
| Edges Ready to be Trimmed Off |
 |
| Edges Trimmed Flush with Underlayment |
When I went to exchange the 80 pound lifters about 2 months prior, the supplier mis-ordered and sent me 110 lb lifter when I order 90 lb. I thought for sure these would be too much pressure for the hatch to handle, but I was wrong, these might even bee a little on the light side. Might have to go to 120 lb.
 |
| Hatch Supported with 110 lb. Hydraulic Lifters / All Lights Working |
 |
| Galley Hatch Installed |
 |
| Another Angle of Hatch Installed |
 |
| Rubber Seal Installed |
 |
| Rubber Seal Installed - Another View |
 |
| Overall Hatch and Seals Installed |
 |
| Hatch Closes and Seals Up Nicely |
 |
| Profile of Hatch Closed with Seal Compressed |
To mark the drill holes for the hatch latch rods in the galley, I placed some double faced sponge tape on the end of the rods, covered the ends with ink and closed the hatch to transfer the marks. This worked pretty good to know where to drill.
 |
| Double-face Tape and Ink to Mark Latch Holes |
 |
| Ink Transferred onto Galley Wall for Drill Hole |
To help keep things clean in the trailer, I found some cheap laminate on sale to cover the floor of the trailer. This will never be seen with the mattress in place, but the wife likes the idea.
 |
| Floating Floor Laninate |
 |
| Floating Floor with Edge Trim |
I installed 2 tie-down into the sub-floor so that if we decide to transport something inside the trailer when going off-road, I can strap things down on top of the mattress.
 |
| Tie-down Passenger Side |
 |
| Tie-down Driver Side |
The only way to get a one-piece mattress into the trailer is to purchase a memory foam mattress that comes fully compressed and can expand after you get it through the door. I purchased this 8" thick, queen size memory foam mattress on Amazon for $120, which was relatively inexpensive.
Everyone who stopped by and looked at my build could not believe a queen size mattress would fit inside this trailer.........prove them wrong!!!!
 |
| Queen Size Mattress Out of the Box |
 |
| Mattress Rolled Out |
 |
| Cutoff the Plastic Wrap and Let it Expand |
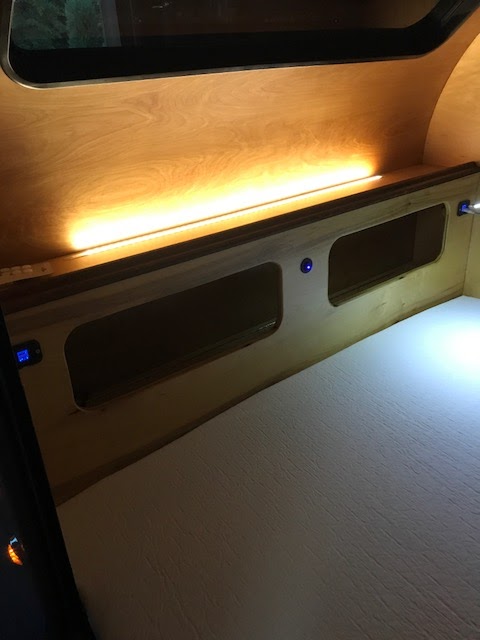
I never really had an opportunity to have all the electrical running at once until I had the converter installed and the battery connected to the converter. The next several photos are of all the different lighting fixtures I installed throughout the build. Every fixture is LED and all lights with the exception of the courtesy lights have dimmers and a remote to control the brightness and light color.
 |
| Flexible Reading Lights in Main Cab |
 |
| Accent Lighting to Illuminate the Main Cab |
 |
| Headboard Lighting with USB Ports and Main Light Switch in Center |
 |
| Galley Lights in Cool White Mode - Dimmed Half Way |
 |
| Galley Lights in Blue Mode |
 |
| Running Lights Wired and Working |
 |
| Tail Lights in Running Mode |
 |
| Right Blinker Illuminated |
 |
| Courtesy Light and Under Carriage Lights On |
 |
| Courtesy Light Driver Side |
 |
| Overall Trailer Lighting |
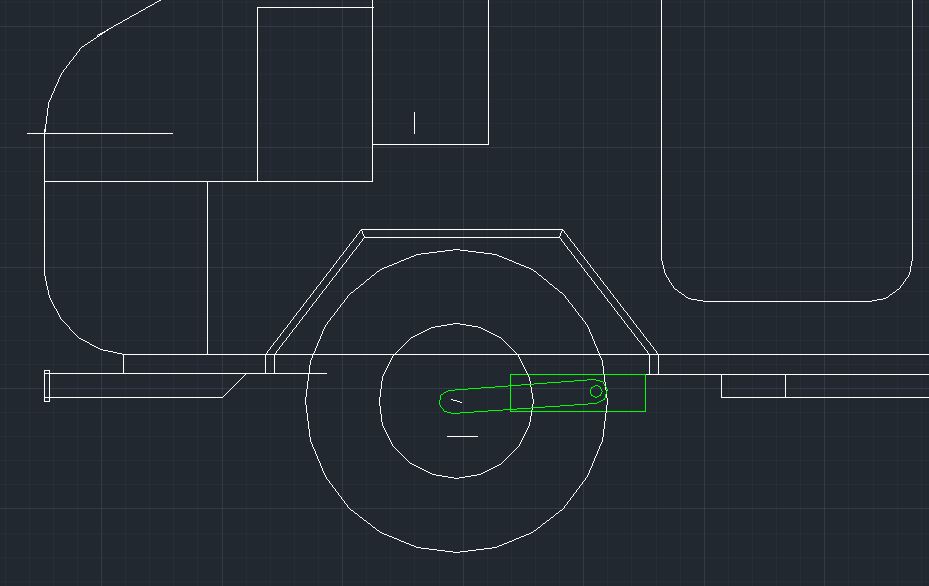
I did have the trailer off the jack stands at one point in the build and was concerned that I did not build the fenders tall enough for the total load of the trailer; approximately 3 inches of clearance when I just had the side walls up for the first time. For starters, this is a Timbren Suspension which has a rebound spring on the front side of the axle. When I had the trailer on the jack stands and the tire mounted (not touching the ground), the weight of the tire and rim partially compressed the rebound spring allowing the axle to hang lower than where it would normally sit in a static load condition. I measured and configured my fenders based on this axle location, which obviously was a mistake. I originally designed for approximately 5-6 inches of clearance from the top of the tire to the bottom of the fender, now I only have a little more than 1 inch clearance. I don't want to rebuild the entire fender so I will design a fender extension that will restore the clearance I need; only problem is, I need to cut the fender off and do some welding adjacent to the finished trailer skin.
 |
| Suspension Under Dead Load |
 |
| Head-on View of Fender Clearance |
 |
| Remaining Clearance Under Dead Load |
Below are drawing of my original concept and the proposed modifications I will make to the fenders. I need to make a horizontal cut to detach the fenders from the support brackets, then I will add 4 inches of vertical extension to the support brackets with 1X rectangular tubing.
 |
| Original Fender Design |
 |
| Actual Fender in Relation to Tire |
 |
| Proposed Modifications to Fender |
Come to find out, that 1 x 3 inch rectangular tubing is the tallest that is made so I will make my own from a 1x3 and 1x1 inch rectangular tubing.
We decided to give the trailer a test run in the back yard just to check things out. I had no problem towing the trailer into the back yard without the fender modifications, but the fender must be completed before taking this rig down the open road.
 |
| Backyard Trial Camping |
 |
| Awning Extended - Time to Relax |
We spent the evening powered strictly off the battery. The mattress is very comfortable and the fantastic fan does an excellent job of keeping the sleeping quarters cool when slightly cracking the side windows on the trailer. Even got to watch a movie on Netflix!
Thanks for viewing - I will provide an update on the fender modifications when the work is finished along with the hatch and battery compartment trim pieces when I get those pieces fabricated.
When I get this thing on the road, I will get an overall trailer weight and tongue weight for you in a later update, along with my spreadsheet on costs for this build.


No comments:
Post a Comment